Showing posts with label hacking. Show all posts

Saturday, September 10, 2011

Save Yourself from Short URL Scams And Hacking

HOW TO: Save Yourself from Short URL Scams And Hacking!


Different URL Shortening services like TinyURL , bit.ly , is.gd , ow.ly , goo.gl , and many more have made it easier for us to share our links with ease, and in a neat and clean way.
But some scammers are also using this service for faking people into scam websites and other fraud affairs as users cannot distinguish between the good and the scam short urls, they look same to us.
So in order toprotect us from these types of scams in social networking sites such as Facebook or micro-blogging sites such as Twitter by means of using short urls, some people at LongURL has come up with the idea of showing previews of the short urls created by a huge number of sites, to users, so that they can see if the site is genuine or fraud. To check a short url follow these steps


Last time i was seen on our 4m s4m hackerz use bit.ly short url 4 hacking ff

Step - 1


Copy the short url you want to check, and then go to
 LongURL.org , and paste the short url in the box provided there, and click Expand!


Step - 2


Now you will be shown the details of the page the short url redirects to, the title of the page, a little description about the page if provided by the webmaster, and the long url it redirectsto.


Tip


If you don't want to visit the LongURL site everytime you want to check for a URL, then you can install the LongURLFirefox Extension to ease your work. Just bring your cursor over the link, andyou'll know about the site.


Get the LongURL Firefox Extension here!


So plz don't click on short url like , bit.ly , is.gd , ow.ly , goo.gl etc etc. If u want to click on this short url then first check the link on longurl.org

Saturday, February 26, 2011

How to Search Music Using Google Search Engine

How to Search Music Using Google Search Engine

How to Search Music Using Google Search Engine
 Ethical Hacking Tutorials

Music is a good entertainment for us while we are reading, cooking, studying and everything. There are many type of music nowadays. Usually, people wants to download their music which their love to hear. So, today I will teach you all how to search music using google search engine.


Just type this code
?intitle:index.of? mp3 Music
?intitle:index.of? mp3 “Music”
?intitle:index.of? mp3 “Music” untitled
?intitle:index.of? mp3 “Music”

Change the Music into allbum or music title your want to download.

I would like to say thank you and highly appreciate your support. Please subscribe from the link bottom to appreciate my work and get the daily updates. Thank You. Happy Ethical Hacking Subscribe to Free Ultimate Download by Email

Tuesday, February 22, 2011

Simple Ping Sweep Using Notepad


 Simple Ping Sweep Using Notepad

This code is a simple batch script for ping sweep if u on the network. Just run it in .bat extension.But what is Ping sweep? Ping sweep  is a technique used to determine which of a range of IP addresses map to live hosts. It consists of ICMP ECHO requests sent to multiple hosts. If a given address is live, it will return an ICMP ECHO reply. A ping is often used to check that a network device is functioning. To disable ping sweeps on a network, administrators can block ICMP ECHO requests from outside sources.  
Also known, basic network scanning technique used to determine which of a range of IP addresses map to live hosts (computers). Whereas a single ping will tell you whether one specified host computer exists on the network, a ping sweep consists of ICMP (Internet Control Message Protocol) ECHO requests sent to multiple hosts. If a given address is live, it will return an ICMP ECHO reply. Ping sweeps are among the older and slower methods used to scan a network.


Copy the code below.

@echo off
cls
@color 0A
echo
echo ********************************
echo *  Ethical Hacking Tutorials Blogspot    *
echo ********************************
echo.
for /l %%a in (1,1,255) do (
ping -n 1 10.19.127.%%a | find "Reply"
)
----------------------------------------------------------------------
 Paste this code in notepad, then save it in "ping sweep.bat". copy include the quote. Save it.


I would like to say thank you and highly appreciate your support. Please subscribe from the link bottom to appreciate my work and get the daily updates. Thank You. Happy Ethical Hacking Subscribe to Free Ultimate Download by Email

Monday, February 21, 2011

What is Windows Product Activation (WPA) and How It Works?


 What is  Windows Product Activation (WPA)  and How It Works?

Windows Product Activation or WPA is a license validation procedure introduced by Microsoft Corporation in all versions of it’s Windows operating system. WPA was first introduced in Windows XP and continues to exist in Windows Server 2003, Windows Vista, Windows Server 2008 and Windows 7 as well. WPA enforces each end user to activate their copy of Windows so as to prevent unauthorized usage beyond the specific period of time until it is verified as genuine by Microsoft. How WPA really works was a closely guarded secret until GmbH analyzed WPA using a copy of Windows XP RC1 and published a paper on their findings.
In this post you will find answers to some of the most frequently asked questions about Windows Product Activation.

Why activation?

Microsoft’s intention behind the activation is to limit the usage of it’s Windows operating system to only one machine for which the retail license is issued. Any other computer which runs on the same license must be disallowed from using the software. Thus WPA demands for activation of the product within 30 days of it’s installation so as to ensure that it is genuine. 

What does “Genuine Windows” means?

The copy of Windows is said to be genuine only if the product key used during the installation is genuine. It means that a given product key (retail license) must be used to install Windows only on one computer for which the license was purchased. Thus if the same key is used for the installation on another computer, then it is said to be a pirated copy. 

Exactly what information is transmitted during the activation?

When you activate your copy of Windows you are transmitting an Installation ID code to the Microsoft either by phone or Internet depending on the method you choose to activate. Based on this, the Microsoft’s licensing system can determine whether or not the installed OS is genuine. If it is said to be genuine, then the system will receive the Activation ID which completes the activation process. If the activation is done via telephone then the Activation ID needs to be entered manually to complete the activation process.

What information does the Installation ID contain?

This Installation ID is a 50-digit number which is derived from the following two data.
1. Product ID – It is actually derived from the 25-digit product key (the alphanumeric value that is printed on the sticker over the Windows CD/DVD case) that is entered during the installation of the operating system. The Product ID is used to uniquely identify your copy of Windows.
2. Hardware ID – This value is derived based on the hardware configuration of your computer. 
The WPA system checks the following 10 categories of the computer hardware to derive the Hardware ID:
  • Display Adapter
  • SCSI Adapter
  • IDE Adapter (effectively the motherboard)
  • Network Adapter (NIC) and its MAC Address
  • RAM Amount Range (i.e., 0-64mb, 64-128mb, etc.)
  • Processor Type
  • Processor Serial Number
  • Hard Drive Device
  • Hard Drive Volume Serial Number (VSN)
  • CD-ROM / CD-RW / DVD-ROM
Thus the Installation ID which is a combination of Product ID and Hardware ID is finally derived and sent to Microsoft during the activation process.

How is the Installation ID validated?

The Installation ID needs to be validated to confirm the authenticity of the installed copy of Windows. So after the Installation ID is received by Microsoft, it is decoded back so as to obtain the actual product key and the hardware details of the computer involved in the activation process.
The Microsoft’s system will now look to see if this is the first time the product key is being used for the activation. This happens when the user is trying to activate his Windows for the first time after purchase. If this is the case then the Installation ID is validated and the corresponding Activation ID is issued which completes the activation process.
However Microsoft system will now associate this product key with the hardware ID of the computer and stores this information on their servers. In simple words, during the first use of the product key, it is paired together with the Hardware ID and this information is stored up on the Microsoft servers.

What if a computer running a pirated copy of Windows attempts to activate?

 The activation fails whenever the copy of Windows installed is not said to be genuine. This usually happens when the product key used for the installation is said to have been used earlier on a different computer. This is determined during the activation process as follows:
During the validation of the Installation ID, the Microsoft’s system checks to see if the same product key was used in any of the previous activation processes. If yes then it looks to see the Hardware ID associated with it. The computer running a pirated copy of Windows will obviously have a different hardware configuration and hence the Hardware ID will mismatch. In this case the activation process will fail.
Thus for a successful activation, either of the following two cases must be satisfied:
  1. The product key must have been used for the first time. ie: The product key should not have been used for earlier activations on any other computer.
  2. If the product key is said to have been used earlier, then the Hardware ID should match. This happens only if the same computer for which the license was genuinely purchased is attempting for subsequent activation.

What about formatting the hard disk?

Each time the hard disk is reformatted and Windows is re-installed, it needs to be re-activated. However the activation process will be completed smoothly since the same computer is attempting for subsequent activation. In this case both the product key and the Hardware ID will match and hence the activation becomes successful.

What is I upgrade or make changes to my hardware?

In the above mentioned 10 categories of hardware, at least 7 should be the same. Thus you are allowed to make changes to not more than 3 categories of hardware. If you make too many changes then your activation will fail. In this case, it is necessary to contact the customer service representative via phone and explain about your problem. If he is convinced he may re-issue a new product key for your computer using which you can re-activate your Windows.

Some things WPA does not do

  • WPA does not send any personal information at all about you to Microsoft. There is still an option to register the product with Microsoft, but that is separate and entirely voluntary.
  • If you prefer to activate via phone, you are not required to give any personal information to Microsoft.
  • WPA does not provide a means for Microsoft to turn off your machine or damage your data/hardware. (Nor do they even have access to your data). This is a common myth that many people have about Microsoft products.
  • WPA is not a “lease” system requiring more payments after two years or any other period. You may use the product as licensed in perpetuity.
 Credit to Gohacking

I would like to say thank you and highly appreciate your support. Please subscribe from the link bottom to appreciate my work and get the daily updates. Thank You. Happy Ethical Hacking Subscribe to Free Ultimate Download by Email

Sunday, February 20, 2011

Reset Trial Version on Kaspersky Anti Virus, Internet Security and Pure By Regedit

Resetting Trial Version on Kaspersky Anti Virus, Internet Security and Pure on Regedit
Resetting Trial Version on Kaspersky Anti Virus, Internet Security and Pure By Regedit
Free Trial Forever

This tutorial will explain how to use kaspersky forever without key or activation code . We only use trial version on kaspersky. Can be use in Kaspersky Anti Virus and Kaspersky Internet Security 6,7,8 and 2011 Pure. You can download kaspersky here.

The method we are going to use is resetting the PCID, so that each time kaspersky thinks its a new computer and gives us a month of fully functional and upgradable trial.

But Firstly, Thank to kadir@Kamen Rider for requesting this tutorial.

SO the method is as explained below :-

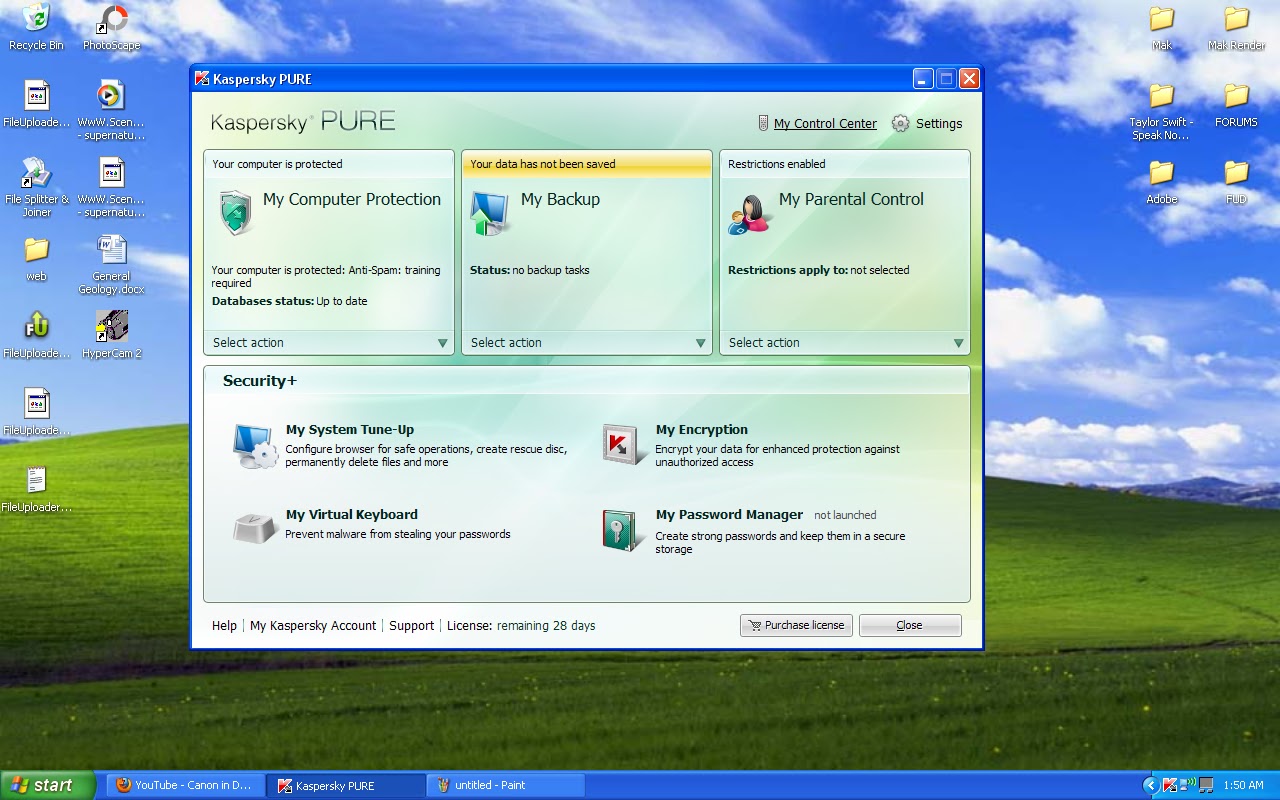
For this tutorial, I need to install Kaspersky Pure 2011 and wait for 3days. All this picture credit to Free Ultimate Download.

Example 28days Kaspersky Pure 2011
See Below


1) First of all delete the existing key if you have.

Existing Key Trial Key

2) Goto Setting, then Self Defence, Uncheck the "Enable Self Defense" and click OK.

 
 Setting

Uncheck Self Defence

3) Now right-click the kaspersky icon from taskbar and click on "Exit".


Now, Self Defence is disable

4) You will get a promt like this . Click "Yes".


5) Now goto run and type in "regedit".

 Start>Run>Regedit>Enter

Regedit

6) Now goto HKEY_LOCAL_MACHINE ---->SOFTWARE ---->KASPERSKYLAB ---->PROTECTED ---->AVP9 ---->ENVIRONMENT .

Double Click to PCID

7) Now in the right hand side you can see PCID. Double click it and change the last two values before the flower bracket and click ok.
eg:- The last two values are "32"... So i change it to "F9"...


PCID Change Last Two Values

8) Now open kaspersky again and you will see this.

Open Kaspersky Pure Again

9) Select "Activate Trial License" and click next.

Activation On 20/2/2011 Expired on 22/3/2011
31Days

10) Now enable Self-Defence and you are good to go.

Credit to Free Ultimate Download

Subscribe Our Update above. Thank You

I would like to say thank you and highly appreciate your support. Please subscribe from the link bottom to appreciate my work and get the daily updates. Thank You. Happy Ethical Hacking Subscribe to Free Ultimate Download by Email

Friday, February 11, 2011

Learn How To Hack Windows XP Part 1 | Ethical Hacking Tutorials

Learn How To Hack Windows XP Part 1 | Ethical Hacking Tutorials

 Learn How To Hack Windows XP Part 3 | Ethical Hacking Tutorials

Alright guys, now we already move on to How to Hack Windows XP part 3. My previous tutorials are part 1 and part 2. Don't waste our time. Lets move on. Firstly.


How to Forge Email with Windows XP Telnet
Want a computer you can telnet into and mess around with, and not get into trouble no matter what you do to it? I've set up my
techbroker.com (206.61.52.33) with user xyz, password guest for you to play with. Here's how to forge email to xyz@techbroker.com using
telnet.

Start with the command:
C:\>telnet techbroker.com 25
Connecting To Techbroker.com
220 <techbroker.com> Service ready
Now you type in who you want the message to appear to come from:
helo santa@techbroker.com
Techbroker.com will answer:
250 <techbroker.com> host ready
Next type in your mail from address:
mail from:santa@techbroker.com
250 Requested mail action okay, completed
Your next command:
rcpt to:xyz@techbroker.com
250 Requested mail action okay, completed
Your next command:
data
354 Start main input; end with <CRLF>.<CRLF>
Newbie note: <CRLF> just means hit return. In case you can't see that little period between the <CRLF>s, what you do to end composing your email is to hit enter, type a period, then hit enter again.
Anyhow, try typing:
This is a test.
.
250 Requested mail action okay, completed
quit
221 <techbroker.com> Service closing transmission channel
Connection to host lost.
Using techbroker's mail server, even if you enable full headers, the
message we just composed looks like:
Status: R
X-status: N
This is a test.

That's a pretty pathetic forged email, huh? No "from", no date.
However, you can make your headers better by using a trick with the data command. After you give it, you can insert as many headers as you choose. The trick is easier to show than explain:
220 <techbroker.com> Service ready
helo santa@northpole.org
250 <techbroker.com> host ready
mail from:santa@northpole.com
250 Requested mail action okay, completed
rcpt to:<script language="JavaScript"><!-- var name = "cmeinel"; var domain = "techbroker.com"; document.write('<a href=\"mailto:' + name + '@' + domain + '\">'); document.write(name + '@' + domain + '</a>'); // --></script>
250 Requested mail action okay, completed
data
354 Start main input; end with <CRLF>.<CRLF>
from:santa@deer.northpole.org
Date: Mon, 21 Oct 2002 10:09:16 -0500
Subject: Rudolf
This is a Santa test.
.
250 Requested mail action okay, completed
quit
221 <techbroker.com> Service closing transmission channel
Connection to host lost.
The message then looks like:
from:santa@deer.northpole.org
Date: Mon, 21 Oct 2002 10:09:16 -0500
Subject: Rudolf
This is a Santa test.
The trick is to start each line you want in the headers with one word
followed by a colon, and the a line followed by "return". As soon as
you write a line that doesn't begin this way, the rest of what you
type goes into the body of the email.
Notice that the santa@northpole.com from the "mail from:" command didn't show up in the header. Some mail servers would show both "from" addresses.
You can forge email on techbroker.com within one strict limitation.
Your email has to go to someone at techbroker.com. If you can find any way to send email to someone outside techbroker, let us know, because you will have broken our security, muhahaha! Don't worry, you have my permission.
Next, you can read the email you forge on techbroker.com via telnet:
C:\>telnet techbroker.com 110
+OK <30961.5910984301@techbroker.com> service ready
Give this command:
user xyz
+OK user is known
Then type in this:
pass test
+OK mail drop has 2 message(s)
retr 1
+OK message follows
This is a test.
If you want to know all possible commands, give this command:
help
+OK help list follows
USER user
PASS password
STAT
LIST [message]
RETR message
DELE message
NOOP
RSET
QUIT
APOP user md5
TOP message lines
UIDL [message]
HELP
Unless you use a weird online provider like AOL, you can use these
same tricks to send and receive your own email. Or you can forge email to a friend by telnetting to his or her online provider's email
sending computer(s).


I would like to say thank you and highly appreciate your support. Please subscribe from the link bottom to appreciate my work and get the daily updates. Thank You. Happy Ethical Hacking Subscribe to Free Ultimate Download by Email

Learn How To Hack Windows XP Part 2 | Ethical Hacking Tutorials

Learn How To Hack Windows XP Part 2 | Ethical Hacking Tutorials

 Learn How To Hack Windows XP Part 2 | 
Ethical Hacking Tutorials


Last tutorial, I already share about how to hack windows xp part 1. Now, we move on to part 2. I will teach about telnet in windows XP.
How to Telnet with Windows XP
The queen of hacker commands is telnet. To get Windows help for
telnet, in the cmd.exe window give the command:
C:\>telnet /?
Here's what you will get:
telnet [-a][-e escape char][-f log file][-l user][-t term][host
[port]]
-a Attempt automatic logon. Same as -l option except uses
the currently logged on user's name.
-e Escape character to enter telnet client prompt.
-f File name for client side logging
-l Specifies the user name to log in with on the remote system.
Requires that the remote system support the TELNET ENVIRON
option.
-t Specifies terminal type.
Supported term types are vt100, vt52, ansi and vtnt only.
host Specifies the hostname or IP address of the remote computer
to connect to.
port Specifies a port number or service name.
****************
Newbie note: what is a port on a computer? A computer port is sort of like a seaport. It's where things can go in and/or out of a computer. Some ports are easy to understand, like keyboard, monitor, printer and modem. Other ports are virtual, meaning that they are created by software. When that modem port of yours (or LAN or ISDN or DSL) is connected to the Internet, your computer has the ability to open or close any of over 65,000 different virtual ports, and has the ability to connect to any of these on another computer - if it is running that port, and if a firewall doesn?t block it.
****************
****************
Newbie note: How do you address a computer over the Internet? There are two ways: by number or by name.
****************
The simplest use of telnet is to log into a remote computer. Give the
command:
C:/>telnet targetcomputer.com (substituting the name of the computer you want to telnet into for targetcomputer.com)
If this computer is set up to let people log into accounts, you may
get the message:
login:
Type your user name here, making sure to be exact. You can't swap between lower case and capital letters. For example, user name Guest is not the same as guest.
****************
Newbie note: Lots of people email me asking how to learn what their user name and password are. Stop laughing, darn it, they really do. If you don't know your user name and password, that means whoever runs that computer didn't give you an account and doesn't want you to log on.
****************
Then comes the message:
Password:
Again, be exact in typing in your password.
What if this doesn't work?
Every day people write to me complaining they can't telnet. That is
usually because they try to telnet into a computer, or a port on a
computer that is set up to refuse telnet connections. Here's what it
might look like when a computer refuses a telnet connection:
C:\ >telnet 10.0.0.3
Connecting To 10.0.0.3...Could not open connection to the host, on port 23. A connection attempt failed because the connected party did not properly respond after a period of time, or established connection failed because connected host has failed to respond.
Or you might see:
C:\ >telnet techbroker.com
Connecting To techbroker.com...Could not open connection to the host, on port 23.
No connection could be made because the target machine actively
refused it.
If you just give the telnet command without giving a port number, it
will automatically try to connect on port 23, which sometimes runs a
telnet server.
**************
Newbie note: your Windows computer has a telnet client program,
meaning it will let you telnet out of it. However you have to install
a telnet server before anyone can telnet into port 23 on your
computer.

*************
If telnet failed to connect, possibly the computer you were trying to
telnet into was down or just plain no longer in existence. Maybe the
people who run that computer don't want you to telnet into it.
How to Telnet into a Shell Account
Even though you can't telnet into an account inside some computer, often you can get some information back or get that computer to do something interesting for you. Yes, you can get a telnet connection to succeed -without doing anything illegal --against almost any computer, even if you don't have permission to log in. There are many legal things you can do to many randomly chosen computers with telnet. For example:
C:/telnet freeshell.org 22
SSH-1.99-OpenSSH_3.4p1
That tells us the target computer is running an SSH server, which enables encrypted connections between computers. If you want to SSH into an account there, you can get a shell account for free at
<http://freeshell.org/> . You can get a free SSH client program from
<http://winfiles.com/> .
One reason most hackers have shell accounts on Internet servers is because you can meet the real hackers there. When you've logged in, give the command w or who. That gives a list of user names. You can talk to other users with tht talk command. Another fun thing, if your shell account allows it, is to give the command
ps -auxww
It might tell you what commands and processes other users are running. Ask other users what they are doing and they might teach you something. Just be careful not to be a pest!
***************
You can get punched in the nose warning: Your online provider might kick you off for making telnet probes of other computers. The solution is to get a local online provider and make friends with the people who run it, and convince them you are just doing harmless, legal explorations.
*************
Sometimes a port is running an interesting program, but a firewall won't let you in. For example, 10.0.0.3, a computer on my local area network, runs an email sending program, (sendmail working together with Postfix, and using Kmail to compose emails). I can use it from an account inside 10.0.0.3 to send emails with headers that hide from where I send things.
If I try to telnet to this email program from outside this computer,
here's what happens:
C:\>telnet 10.0.0.3 25
Connecting To 10.0.0.3...Could not open connection to the host, on
port 25.
No connection could be made because the target machine actively
refused it.
However, if I log into an account on 10.0.0.3 and then telnet from
inside to port 25, here's what I get:
Last login: Fri Oct 18 13:56:58 2002 from 10.0.0.1
Have a lot of fun...
cmeinel@test-box:~> telnet localhost 25
Trying ::1...
telnet: connect to address ::1: Connection refused
Trying 127.0.0.1... [Carolyn's note: 127.0.0.1 is the numerical
address meaning localhost, the same computer you are logged into]
Connected to localhost.
Escape character is '^]'.
220 test-box.local ESMTP Postfix
The reason I keep this port 25 hidden behind a firewall is to keep
people from using it to try to break in or to forge email. Now the
ubergeniuses reading this will start to make fun of me because no
Internet address that begins with 10. is reachable from the Internet.
However, sometimes I place this "test-box" computer online with a
static Internet address, meaning whenever it is on the Internet, it
always has the same numerical address. I'm not going to tell you what its Internet address is because I don't want anyone messing with it. I just want to mess with other people's computers with it, muhahaha. That's also why I always keep my Internet address from showing up in the headers of my emails.
***************
Newbie note: What is all this about headers? It's stuff at the
beginning of an email that may - or may not - tell you a lot about
where it came from and when. To see full headers, in Outlook click
view -> full headers. In Eudora, click the "Blah blah blah" icon.

****************


I would like to say thank you and highly appreciate your support. Please subscribe from the link bottom to appreciate my work and get the daily updates. Thank You. Happy Ethical Hacking Subscribe to Free Ultimate Download by Email

Thursday, February 10, 2011

Learn How To Hack Windows XP Part 1 | Ethical Hacking Tutorials

 Learn How To Hack Windows XP Part 1 | Ethical Hacking Tutorials

 Learn How To Hack Windows XP Part 1 | Ethical Hacking Tutorials
Part I: The Magic of DOS
In this guide you will learn how to telnet <beginninea.shtml>, forge email, <beginnineb.shtml> use
nslookup <beginninec.shtml> and netcat <beginnined.shtml> with Windows XP.
So you have the newest, glitziest, "Fisher Price" version of Windows: XP. How can you use XP in a way that sets you apart from the boring millions of ordinary users?
****************
Loser Alert: Anyone who thinks this GTMHH will reveal how to blow up people's TV sets and steal Sandra Bullock's email is going to find out that I won't tell them how.
****************
The key to doing amazing things with XP is as simple as D O S. Yes, that's right, DOS as in MS-DOS, as in MicroSoft Disk Operating System. Windows XP (as well as NT and 2000) comes with two versions of DOS. Command.com is an old DOS version. Various versions of command.com come with Windows 95, 98, SE, ME, Window 3, and DOS only operating systems.
The other DOS, which comes only with the XP, 2000 and NT operating systems, is cmd.exe. Usually cmd.exe is better than command.com because it is easier to use, has more commands, and in some ways resembles the bash shell in Linux and other Unix-type operating systems. For example, you can repeat a command by using the up arrow until you back up to the desired command. Unlike bash, however, your DOS command history is erased whenever you shut down cmd.exe. The reason XP has both versions of DOS is that sometimes a program that won?t run right in cmd.exe will work in command.com
****************
Flame Alert: Some readers are throwing fits because I dared to compare DOS to bash. I can compare cmd.exe to bash if I want to. Nanny nanny nah nah.
****************
DOS is your number one Windows gateway to the Internet, and the open sesame to local area networks. From DOS, without needing to download a single hacker program, you can do amazingly sophisticated explorations and even break into poorly defended computers.
****************
You can go to jail warning: Breaking into computers is against the law if you do not have permission to do so from the owner of that computer. For example, if your friend gives you permission to break into her Hotmail account, that won't protect you because Microsoft owns Hotmail and they will never give you permission.
****************
****************
You can get expelled warning: Some kids have been kicked out of school just for bringing up a DOS prompt on a computer. Be sure to get a teacher's WRITTEN permission before demonstrating that you can hack on a school computer.
****************
So how do you turn on DOS?
Click All Programs -> Accessories -> Command Prompt
That runs cmd.exe. You should see a black screen with white text on it, saying something like this:
Microsoft Windows XP [Version 5.1.2600]
(C) Copyright 1985-2001 Microsoft Corp.
C:\>
Your first step is to find out what commands you can run in DOS. If you type "help" at the DOS prompt, it gives you a long list of commands. However, this list leaves out all the commands hackers love to use. Here are some of those left out hacker commands.
TCP/IP commands:
telnet
netstat
nslookup
tracert
ping
ftp
NetBIOS commands (just some examples):
nbtstat
net use
net view
net localgroup
TCP/IP stands for transmission control protocol/Internet protocol. As you can guess by the name, TCP/IP is the protocol under which the Internet runs. along with user datagram protocol (UDP). So when you are connected to the Internet, you can try these commands against other Internet computers. Most local area networks also use TCP/IP.
NetBIOS (Net Basic Input/Output System) protocol is another way to communicate between computers. This is often used by Windows computers, and by Unix/Linux type computers running Samba. You can often use NetBIOS commands over the Internet (being carried inside of, so to speak, TCP/IP). In many cases, however, NetBIOS commands will be blocked by firewalls. Also, not many Internet computers run NetBIOS because it is so easy to break in using them. We will cover NetBIOS commands in the next Guide to XP Hacking.


I would like to say thank you and highly appreciate your support. Please subscribe from the link bottom to appreciate my work and get the daily updates. Thank You. Happy Ethical Hacking  

Wednesday, February 9, 2011

How To Tweak for Firefox and Firefox 4.0 GUI Customize

How To Tweak for Firefox and Firefox 4.0 GUI Customize

 How To Tweak for Firefox and Firefox 4.0 GUI Customize
 
OK2...first, ak mntak maaf sbb gune dwibahasa...sbb tutorial ni ak copy n revise sndiri nk bgi lagi cntik..erm, tujuan kite adalah utk jadi cmni ;
Resized to 82% (was 1288 x 800) - Click image to enlargeClick this bar to view the original image of 800x497px.


Kat sini ak akan tunjuk cmne cara utk jadi mcm kat atas tuh...skrang ni kite gune Firefox 3.6.13 untuk dapat interface( GUI ) mcm firefox 4.0 tapi siap ada addon2 yg menarik dan untuk tambah security browser.
Ni adalah listing untuk addon2 yang akan kita install brsame description dia :

1.AdblockPlus{1.3.3}.xpi -- Ads were yesterday!
2. AddNEditCookies+{0.3.1}.xpi -- Cookie Editor that allows you add and edit session and saved cookies (fixed)
3.BetterPrivacy{1.48.3}.xpi -- "Super-Cookie Safeguard"
4. BoostforFacebook{11.0.0}.xpi -- Enhancements for Facebook by StudioBoost
6. Desktop{1.3.0.50}.xpi -- Customize the plain blank tab on front tab of Firefox
7. DontPhishMe{0.3.2}.xpi -- Anti-phishing addon that provide the Malaysian Internet user with information and notification to protect them against online banking phishing in Malaysia.
8. Echofon{1.9.7.3}.xpi -- This extension lets you know twitter statuses.
9. ElementHidingHelperforAdblockPlus{1.1}.xpi -- Helps you create element hiding rules for Adblock Plus to fight the text ads.
10. FEBE{6.3.3.2}.xpi -- Backup your Firefox data
11. FacebookPhotoZoom{1.9}.xpi -- Enlarge Facebook thumbnails on the fly
12. FireDownload{2.0.1}.xpi -- Supercharge your web downloads up to 10x as fast using multi-source downloading.
14. Fission{1.0.9}.xpi -- Progress bar in the address bar (Safari style).
15. Flagfox{4.0.12}.xpi -- Displays a flag depicting the location of the current server
16. Flashblock{1.5.14.2}.xpi -- Replaces Flash objects with a button you can click to view them.
17. Greasemonkey{0.8.20100408.6}.xpi -- A User Script Manager for Firefox
18. IntegratedGmail{2.6.9}.xpi -- Seamlessly into the gmail interface below the inbox (rather than the sidebar) using a collapsible box. Works w/Google Apps Accounts.
19. Linkification{1.3.8}.xpi -- Converts text links into genuine, clickable links.
20. MRTechToolkit{6.0.4}.xpi -- (Formerly Local Install) Extension, theme and other power tools for all users.
21. Omnibar{0.7.2.20100912}.xpi -- Integrates search bar to the location bar.
22. OpenBookmarksinNewTab{0.1.2010043001}.xpi -- Always opens new tab from bookmarks.
23. ScrapBook{1.3.7}.xpi -- Helps you to save Web pages and organize the collection.
24. ShowPassword{1.5}.xpi -- If you are not worried about someone looking from behind your back and stealing your passwords, why take additional pain for typing **** password fields,
25. SmartBookmarksBar{1.4.3}.xpi -- Organize your toolbar efficiently.
26. StrataBuddy{0.6.2}.xpi -- Companion add-on for Strata40.
27. TabScope{0.3.7}.xpi -- Preview and navigate tab contents through popup.
28.TubeStop{1.5}.xpi -- Stops the auto-play of YouTube videos.
29. UnitedStatesEnglishSpellchecker{5.0.1}.xpi -- English United States (en-US) Spellchecker
30. VacuumPlacesImproved{1.1}.xpi -- Defragment your firefox places.sqlite database to speed-up Firefox
31. WOT{20100908}.xpi -- Web of trust.
32. Strata40{0.6.2}.jar -- tiny.cc/strata40 | Inspired by Firefox 4 mockups.

Mane yg ak bold tu boleh dikatekan penting n recomendded untuk install tp suggest korang install sume sbb baru nmpak cool n beneficial...tapi kalau korang x main Facebook atau x nk certain2 add on kat site Gmail contohnya, boleh la korang disable atau tak payah install terus( bleh tengok description addon tuh, ak nk expain dalam BM mcm bnyak jer..hehe )

OK, step2 nyer :
1. Install dulu firefox version 3.6.13 tu..yg older pn boleh tapi ak recommend kan yg latest la kan...klau da install sbelum ni, boleh proceed utk cari addon.

2. Install sume addon2 yg ak list tu( klau tak nak x pe ), boleh pegi ke site addon firefox dan buat search atau klik jer link kat atas tuh..

3. Consider korang sume da install sume tuh...restart your firefox bila da kuar arahan dalam pic ni..suggestion korang restart lepas da install semua sbb jimat masa.
pic 1

4. Bile dah bukak, nanti dia akan kuar beberapa tab baru utk inform korang da install beberapa addon sesebuah company tu...bla3...dan ada jugak option utk select sesuatu seperti untuk addon AdBlock Plus, ak suggest korang tekan jer OK.

5. Lepas tu, korang pegi ke Tools >Add-ons dan carikan StrataBuddy seterusnya tekan butang Options. Kat step ni mesti lah theme yg active adalah Strata40..boleh recheck kat Tools>>Add-on>>Themes
pic 2

6. Akan ada 1 windows yg akan kuar(App Button ), dan pilih option mcm gamba kat bwah...( ni ikut citarasa sendiri jgak ).. Masa klik tu, perubahan adalah instant, boleh observe sendiri ok..
pic 3

7. Klik pada tab sebelah n ikot pic kat bwah jugak..yang ni kena wat 'Aero Glass' baru nampak lagi cun.
pic 4

8. Pada option 'Tabs' pula, ni pun boleh ikot gambar, tp atas citarasa sendiri gak..
pic 5

9. Kat 'Misc' tu, boleh pilih sendiri, tapi nk lagi lawa boleh refer pic bwah..lepas da siap, boleh close sume window tu dan kembali ke firefox.
pic 6

10. Optional untuk sape2 nak hide kat Menu Bar yang kat top panel firefox kite tu boleh refer cini...dia akan jadi autohide..untuk kembalikan dia boleh tekan button 'Alt' @ F10.
pic 7

11. Lepas da siap wat sume tuh, firefox anda akan kelihatan seperti berikut :
pic 8
-addon2 ni yg korang install jadi gini ;
- Fission - Progress line warna hijau untuk show progress loading sesuatu site.
- Omnibar - Untuk gabung address bar dengan search bar untuk jadi 1 bar sahaja yg cool.
- Tab Scope - Klau korang point kan mouse kat tab sebelah yang current active, korang boleh tengok preview dia mcm dalam pic kat atas.
- Flagfox - Untuk tunjuk website tu berasal dari mane server dia( kat address bar hujung skali )

11. Ok, utk customize blank page firefox pula, kita guna addon Desktop. cuba klik button new tab..mesti ada kuar layout baru kn..OK right klik dan pilih 'Preference' dan klik 'Browse' utk pilih gamba sendiri utk jadi mcam pic atas skali tuh...
pic 9

12. Untuk tambah screenshot website favourite kita pulak, boleh right klik kat 'new tab' page tadi, pilih ' thumnails' dan type website yg korang suka...tapi makesure korang browse dulu ke website tu, sebab addon ni akan capture cache yang ada utk website tu dan jadi kan sbagai thumbnails..
pic 10

13. Dan, bukan thumbnails saja korang boleh tambah, folder atau search juga boleh tambah ikut citarasa masing2...untuk reposition mende2 tu, boleh jer drag n drop kat tempat2 yang berkenan ikut grid yang ade, grid tu pun boleh tukar size dia( right klik>>grid)
pic 11

Da siap spenuh nya untuk customize firefox...tiba masa untuk tweak plak..

a. Mula2 buka link ni about:config dekat new tab, dan klik 'I promise' tuh..
Resized to 82% (was 1292 x 800) - Click image to enlargeClick this bar to view the original image of 800x495px.


b. Skrang ak list kan tweak2 untuk laju kan firefox nih...cara dia adalah cume taip ( sori bahasa campur, sbb ak copy pasta..hehe )

1. Disable Extension Compatibility Checks
extensions.checkCompatibility = False
extensions.checkUpdateSecurity = False

2. Speed increase. Set..

network.http.pipelining to true
network.http.proxy.pipelining to true
network.http.pipelining.maxrequests 30 to 8
network.http.max-connections 30 to 96
network.http.max-connections-per-server 15 to 32
network.http.max-persistent-connections-per-server 6 to 8
network.http.pipelining.ssl false to true


Right Click –> New– > Interger or String

“content.notify.backoffcount”: set “5“; (Five) ---> integer
“plugin.expose_full_path”: set “true”. ---> string
“ui.submenuDelay”: set “0; (zero) ----> integer

3.Right-click anywhere and select New-> Integer.

Name it “nglayout.initialpaint.delay” and set its value to “0″.
This value is the amount of time the browser waits before it acts on information it receives.
If you’re using a broadband connection you’ll load pages 2-30 times faster now

4. Location Bar (Set number Auto Complete URL at Address Bar)

This is a good hack to trim down that huge auto-complete list on your URL bar. By default it displays maximum 12 URL
browser.urlbar.maxRichResults = #
Enter Number at # (3,10,12 etc)

5. Reduce RAM usage to 10mb when Firefox is minimized

Right Click in the page and select New -> Boolean.
In the box that pops up enter “config.trim_on_minimize”. Press Enter.
Now select True and then press Enter.

6. Limit RAM usage. ( optional )

If Firefox takes up too much memory on your computer, you can limit the amount of RAM it is allowed to us. Filter “browser.cache” and select “browser.cache.disk.capacity”. It’s set to 50000, but you can lower it, depending on how much memory you have. Try 15000 if you have between 512MB and 1GB ram.

7. Reduce RAM usage further for when Firefox is minimized.

This setting will move Firefox to your hard drive when you minimize it, taking up much less memory. And there is no noticeable difference in speed when you restore Firefox, so it’s definitely worth a go. Right-click anywhere and select New-> Boolean. Name it “config.trim_on_minimize” and set it to TRUE.

8. Move or remove the close tab button. ( optional )
Do you accidentally click on the close button of Firefox’s tabs? You can move them or remove them. Edit the preference for “browser.tabs.closeButtons”. Here are the meanings of each value:

* 0: Display a close button on the active tab only
* 1: (Default) Display close buttons on all tabs
* 2: Don’t display any close buttons
* 3: Display a single close button at the end of the tab bar (Firefox 1.x behavior)

9. Disable Prefetch (Helpful for frequent Google searcher, low-speed internet connection or low RAM)
network.prefetch-next = False

10. Extend Spell check to forms
layout.spellcheckDefault = 2
Change Value from 1 to 2

11. Disabler Browser Toolbar Tip
browser.chrome.toolbar_tips = False

12. Show More Tabs on Single Firefox Window before Scrolling
browser.tabs.tabMinWidth = 75
Setting lesser value with reduce Tab width

Ni lak userscript utk addon Greasmonkey..
link -- Script ni untuk check sesuatu file di sesebuah hosting seperti di Hotfile.com tanpa perlu buka page hotfile tersebut...script ni akan check dan tunjuk tick warna hijau jika file untuk di download tersebut masih ada di hosting tersebut..list2 hosting yg di sokong anda boleh tengok sendiri di link atas...recommended to install

Ok, tu je la tweak yang ak dpt share...klau ade lagi sila komen ye, nanti ak tambah...

p/s : ak nk rephrase addon yg ak suke kat ats tuh..
1. FEBE --bleh backup n restore sume data2 kita
2. Dont phish me -- bleh detect phising( web palsu ) semasa kita surf web..contoh fake maybank2u.com website..
3. facebook photo zoom -- bleh zoom picture seseorang tanpa perlu klik kat picture tuh..
4. Fire download -- boleh replace downloader firefox bese, n same laju ngan IDM tau..jgn men2..
5. Flashblock -- sekat mana2 flash sbelum dia loading...boleh lajukan browsing speed kita.
6. Integrated Gmail -- bagi interface lagi cun kat gmail kita...
7. Scrapbook -- Boleh capture webpage lengkap..berguna untuk tengok page tu pada masa2 lain... <-- ak suke nih
8. MR Tech toolkit -- sebagai tools manager kita...senang nk handle2 sume yg berkaitan dengan firefox nih..cth: theme, addon
9.Show password -- boleh tengok password kita walaupun di hide kn oleh firefox...alih je pointer mouse ke text box password..
10. vaccuum place improved -- klik skali utk dia clean mane2 tempat yg tersumbat...haha..boleh laju kan load time firefox
11. WOT -- bleh tunjuk website yang tak selamat utk di surf

Thanks to R-H and arefiqrc

I would like to say thank you and highly appreciate your support. Please subscribe from the link bottom to appreciate my work and get the daily updates. Thank You. Happy Ethical Hacking

Subscribe to Free Ultimate Download by Email

Tuesday, February 8, 2011

Ultimate® Wireless Hacking Ever Guide For Noobs With Commview For WiFi


Ultimate® Wireless Hacking Ever Guide For Noobs With Commview For WiFi


Ultimate® Wireless Hacking Ever Guide For Noobs With Commview For WiFi

CommView is a powerful network monitor and analyzer designed for LAN administrators, security professionals, network programmers, home users…virtually anyone who wants a full picture of the traffic flowing through a PC or LAN segment. Loaded with many user-friendly features, CommView combines performance and flexibility with an ease of use unmatched in the industry. In this thread I will provide you with software download and Manual on how to do it all by yourself! This is the one and only most noob proof guide me ever made! You will be able to hack any W-LAN in your range with ease and safety. The software provided is cracked and not infected anyhow.


This application captures every packet on the wire to display important information such as a list of packets and network connections, vital statistics, protocol distribution charts, and so on. You can examine, save, filter, import and export captured packets, view protocol decodes down to the lowest layer with full analysis of over 70 widespread protocols. With this information, CommView can help you pinpoint network problems and troubleshoot software and hardware.

How can a network analyzer help me?


If you are a seasoned professional, you definitely know the answer. Managing a LAN, creating network-oriented software, or performing a security audit have one thing in common: You're blind without a good network monitor. Every day, it helps you maintain efficient network data transmission, test firewalls and intrusion detection systems, or identify problems with network-based applications. And there is an important economic reason behind using a network analyzer: it costs a fraction of the price of information, time, software, and hardware that may potentially be lost or wasted by not using a network analyzer. A number of case studies describe real-world applications of CommView in business, government, and education sectors.

If you are new to networking, you'll find CommView extremely useful for understanding how the Internet and your LAN work. Being a network analyzer (also commonly referred to as a packet analyzer, network monitor, or packet sniffer), it captures and decodes network traffic and makes sense of it, allowing you to see what, where, and how information leaves and enters your computer -- which is critically important for a secure Internet experience. The Online Tutorial is an excellent resource for learning about the many exciting features CommView offers.

What you can do with CommView:

* View detailed IP connections statistics: IP addresses, ports, sessions, etc.
* Reconstruct TCP sessions.
* Map packets to the application that is sending or receiving them.
* View protocols distribution, bandwidth utilization, and network nodes charts and tables.
* Generate traffic reports in real time.
* Browse captured and decoded packets in real time.
* Search for strings or hex data in captured packet contents.
* Import and export packets in Sniffer®, EtherPeek™, AiroPeek™, Observer®, NetMon, and Tcpdump formats, export packets in hex and text formats.
* Configure alarms that can notify you about important events, such as suspicious packets, high bandwidth utilization, unknown addresses, etc.
* Create your own plug-ins for decoding any protocol.
* Exchange data with your application over TCP/IP.
* Export any IP address to SmartWhois for quick, easy IP lookup.
* Capture loopback traffic (a new, unique feature in version 4.1).

Download Link
Install it and crack it as any other application.

Wireless Hacking Plugin + Manual Download:
http://www.mediafire.com/?j2uuymzw3mt 
Run the application and read the manual to help you with process.


I would like to say thank you and highly appreciate your support. Please subscribe from the link bottom to appreciate my work and get the daily updates. Thank You. Happy Ethical Hacking

Subscribe to Free Ultimate Download by Email