Showing posts with label video. Show all posts

Sunday, May 29, 2011

Metasploit Basics Part 1 - Understanding the framework

This post will include basic introduction to metasploit & its working.


What is Metasploit ?

The Metasploit Project is an open-source computer security project which provides information about security vulnerabilities and aids in penetration testing and IDS signature development. Its most well-known sub-project is the Metasploit Framework, a tool for developing and executing exploit code against a remote target machine. Other important sub-projects include the Opcode Database, shellcode archive, and security research.

Basically Metasploit is tool which provides complete environment for hacking.

Metasploit is ran by rapid7 community & Metasploit is the biggest software which is written in ruby
Why metasploit is recommended ?

  1. metasploit is free n easy to use and one can develop his own exploits,payloads etc & use it with metasploit easily.
  2.  It comes with over 690 exploits & which are updated on regular basis(0days also included).
  3. We can use diffrent plugins,external tools to improve the productivity of metasploit for example SET(social engineering toolkit), beEF, XSSF, Nexpose , NMAP, W3af etc(we will continue to it in next posts)


Metasploit is available in 3 versions

  1. Metasploit Pro - for pentester
  2. Metasploit Express- for IT security teams
  3. Metasploit Framework - Its an open source & avialable for download for free

you can download metasploit from official website - www.metasploit.com

Working of Metasploit

metasploit

Basically metasploit works on these 5 things
  1. EXPLOIT
  2. PAYLOADS
  3. AUXILIARY
  4. NOPS & ENCODERS
 What is an exploit -

To take advantage of a vulnerability, you often need an exploit, a small and highly specialized computer program whose only reason of being is to take advantage of a specific vulnerability and to provide access to a computer system. Exploits often deliver a payload to the target system to grant the attacker access to the system.Here is a article on basic working of EXPLOITS

What is a payload?
A payload is the piece of software that lets you control a computer system after it’s been exploited. The payload is typically attached to and delivered by the exploit. Just imagine an exploit that carries the payload in its backpack when it breaks into the system and then leaves the backpack there.

Basically payload is the way you want to hack your target.Meterpreter is the most reliable payload & we will use it in most of the cases ahead

What is auxiliary?

Metasploit comes with 358 auxiliary.Basically auxiliary is used for information gathering before exploitation for ex if the machine is vulnerable to an attack or not . Here is video on email extractor auxiliary.

What are Nops & Encoders?

Metasploit comes with 8nops & 27 encoders these are used to bypass antiviruses/firewall via different techniques

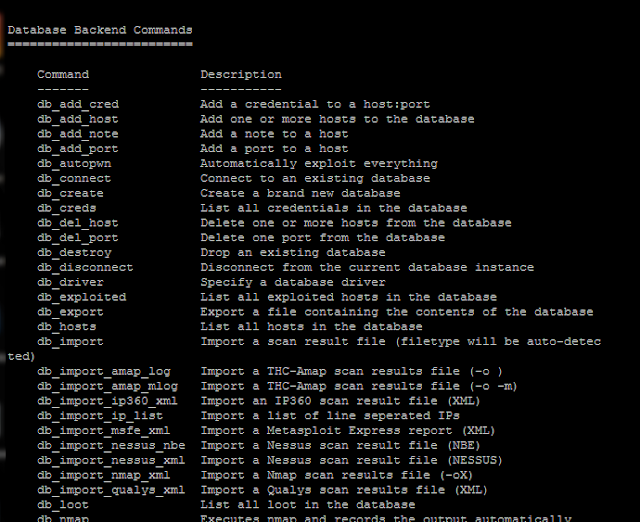
So moving on to metasploit framework & some important commands
metasploit console is easy to understand if one uses his common sense

the help command does the trick.It shows all the commands available in metasploit.

metasploit help


We will move onto series of discussions & tutorial on metasploit later


Links worth spending time:
metasploit unleashed
Corelan


Dont forget to subscribe to our email updates

Monday, May 2, 2011

NMAP TUTORIAL

NMAP(Network Mapper) is one of the most basic & advanced fingerprinting tool.I recommend this tool to everyone.


Basically NMAP is port scanner with advanced features like host identification topology etc

The six port states recognized by Nmap
OPEN
An application is actively accepting TCP connections, UDP datagrams or SCTP associations on this port. Finding these is often the primary goal of port scanning. Security-minded people know that each open port is an avenue for attack. Attackers and pen-testers want to exploit the open ports, while administrators try to close or protect them with firewalls without thwarting legitimate users. Open ports  are also interesting for non-security scans because they show services available for use on the network.
CLOSED
A closed port is accessible (it receives and responds to Nmap probe packets), but there is no application listening on it. They can be helpful in showing that a host is up on an IP address (host discovery, or ping scanning), and as part of OS detection. Because closed ports are reachable, it may be worth scanning later in case some open up. Administrators may want to consider blocking such ports with a firewall. Then they would appear in the filtered state, discussed next.     
FILTERED 
Nmap cannot determine whether the port is open because packet filtering prevents its probes from reaching the port. The filtering could be from a dedicated firewall device, router rules, or host-based firewall software. These ports frustrate attackers because they provide so little information. Sometimes they respond with ICMP error messages such as type 3 code 13 (destination unreachable: communication administratively prohibited), but filters that simply drop probes without responding are far more common. This forces Nmap to retry several times just in case the probe was dropped due to network congestion rather than filtering. This slows down the scan dramatically.
 
UNFILTERED 
The unfiltered state means that a port is accessible, but Nmap is unable to determine whether it is open or closed. Only the ACK scan, which is used to map firewall rulesets, classifies ports into this state. Scanning unfiltered ports with other scan types such as Window scan, SYN scan, or FIN scan, may help resolve whether the port is open.
 
open|filtered
Nmap places ports in this state when it is unable to determine whether a port is open or filtered. This occurs for scan types in which open ports give no response. The lack of response could also mean that a packet filter dropped the probe or any response it elicited. So Nmap does not know for sure whether the port is open or being filtered. The UDP, IP protocol, FIN, NULL, and Xmas scans classify ports this way.
 
closed|filtered
This state is used when Nmap is unable to determine whether a port is closed or filtered. It is only used for the IP ID idle scan.
here are the two videos showing basics of nmap


For those who have low bandwith nd cant go through videos
 Here i used Zenmap(nmap GUI) to scan my windows machine on vmware i used intensive scan with all 65535 ports to scan
 Results were really cool showing all my open ports + os detection was accurate

you can download nmap from here 

do share your views for this tut

Sunday, April 24, 2011

Metasploit (Video Tutorials)


Metasploit is one of the tool that every hacker have in his tool kit which contains lots of modules and exploits which can be used with various payloads to  break into boxes.

In this video series you will go through the metasploit framework starting from the very basics of metasploit and slowly more towards  intermediate and advanced functionality, including creation of Meterpreter scripts and extending the framework.

Video Series Link (Original source)

1. Metasploit Megaprimer Part 1 (Exploitation Basics and need for Metasploit)

http://www.securitytube.net/video/1175

2. Metasploit Megaprimer Part 2 (Getting Started with Metasploit)
http://www.securitytube.net/video/1176

3. Metasploit Megaprimer Part 3 (Meterpreter Basics and using Stdapi)
http://www.securitytube.net/video/1181

4. Metasploit Megaprimer Part 4 (Meterpreter Extensions Stdapi and Priv)
http://www.securitytube.net/video/1182

5. Metasploit Megaprimer Part 5 (Understanding Windows Tokens and Meterpreter Incognito)
http://www.securitytube.net/video/1183

6. Metasploit Megaprimer Part 6 (Espia and Sniffer Extensions with Meterpreter Scripts)
http://www.securitytube.net/video/1184

7. Metasploit Megaprimer Part 7 (Metasploit Database Integration and Automating Exploitation)
http://www.securitytube.net/video/1185

8. Metasploit Megaprimer Part 8 (Post Exploitation Kung Fu)
http://www.securitytube.net/video/1187

9. Metasploit Megaprimer Part 9 (Post Exploitation Privilege Escalation)
http://www.securitytube.net/video/1188

10. Metasploit Megaprimer Part 10 (Post Exploitation Log Deletion and AV Killing)
http://www.securitytube.net/video/1189

11. Metasploit Megaprimer Part 11 (Post Exploitation and Stealing Data)
http://www.securitytube.net/video/1190

12. Metasploit Megaprimer Part 12 (Post Exploitation Backdoors and Rootkits)
http://www.securitytube.net/video/1191

13. Metasploit Megaprimer Part 13 (Post Exploitation Pivoting and Port Forwarding)
http://www.securitytube.net/video/1192

14. Metasploit Megaprimer Part 14 (Backdooring Executables)
http://www.securitytube.net/video/1198

15. Metasploit Megaprimer Part 15 (Auxiliary Modules)
http://www.securitytube.net/video/1199

16. Metasploit Megaprimer Part 16 (Pass the Hash Attack)
http://www.securitytube.net/video/1215

17. Metasploit Megaprimer Part 17 (Scenario Based Hacking)
http://www.securitytube.net/video/1219

Download (Part - Part )

http://www.filesonic.com/file/105648012/metasploit_megaprimer.part1.rar 

http://www.filesonic.com/file/105647782/metasploit_megaprimer.part2.rar 

http://www.filesonic.com/file/105648392/metasploit_megaprimer.part3.rar 

http://www.filesonic.com/file/105647932/metasploit_megaprimer.part4.rar 

http://www.filesonic.com/file/105641352/metasploit_megaprimer.part5.rar


I take no authorization of the content.

Wednesday, April 13, 2011

Network Sniffers Class for the Kentuckiana ISSA 2011

This time Gary Hampton joins me to impart his knowledge of using Wireshark to diagnose problems on wireless networks. I cover the usual suspects:  TCPDump, Metasploit sniffing with Meterpreter, ARP Poisoning, Ettercap, Cain, NetworkMinor, Firesheep and Xplico. I lost part of Gary's on screen demo when my recording rig froze up, and I apparently did not make a proper sacrifice to the demo gods for my section when I tried to show off Ettercap filters, but I hope you still find it informative.


Part 1: Intro to Sniffers


Sniffers Class Part 1 from Adrian Crenshaw on Vimeo.

Download: http://www.archive.org/download/IssaSniffersClass/sniffers1.avi

Part 2: Wireshark and Wireless with Gary Hampton

Sniffers Class Part 2 from Adrian Crenshaw on Vimeo.


Download: http://www.archive.org/download/IssaSniffersClass/sniffers2.avi

Part 3: A little more Wireshark, TCPDump, Metasploit sniffing with Meterpreter, ARP Poisoning, Ettercap, Cain, NetworkMinor, Firesheep, Xplico and bridging.


Sniffers Class Part 3 from Adrian Crenshaw on Vimeo.

Commands used:
Wireshark Demo
 
1.       Run Wireshark
2.       Basic start capture
3.       Start capture with options
4.       Drill down OSI
5.       Capture filter options (4.9 in book)
not tcp port 3389
not broadcast and not multicast
6.       Show a packet
7.       Pop a packet out
8.       Sort by columns
9.       Follow stream (web traffic)
10.    Export HTTP Objects
11.    Simple view filters
tcp.port == 80
!(ip.addr == 192.168.1.13)
12.    Filter builder
13.    Apply filters from different panes (packet vs. details panes).
14.    Save filters
15.     Open a Wiki page
16.    Edit-> Find packet
17.    Analyzers ->Expert Info
18.    Analyzers ->Firewall ACLs
19.    Stats
20.    Color rules
21.    Save capture
22.    Mention Lua
Dumpcap/TCPDump
    dumpcap –D
    dumpcap -i eth0 -s 0 -f "port 80" -w webtraffic.pcap
Sniffing in Monitor mode
   ifconfig wlan0 down
   iwconfig wlan0 mode monitor
   iwconfig wlan0 channel 1
   ifconfig wlan0 up
Ettercap Demo
1.      ettercap -T –q –i eth0 -M ARP // //
2.      ettercap -T –q –i eth0 -M ARP // /10.1.1.1/
3.      Show ARP traffic
4.      Telnet to 10.1.1.1
5.      http to 10.1.1.1
6.      FTP/Telnet/HTTP someplace with a password
7.      Show find sniffers
ettercap –G
ettercap –T –I eth0 –P list
ettercap –T –I eth0 –P search_promisc  //
8.      Filters:
     etterfilter ig.filter -o ig.ef
     ettercap -T -q -F ig.ef -M ARP // //
9.      Mention MITM: icmp, dhcp, port filters
10.    driftnet -i eth0
11.    Etherape
Cain Demo
1.      Start poisoning
2.      Telnet to 10.1.1.1
3.      http to 10.1.1.1
4.      FTP/Telnet/HTTP someplace with a password
5.      SSL someplace from VM
6.      Sniff RDP
ARPSpoof Demo
   cat /proc/sys/net/ipv4/ip_forward
   echo 1 > /proc/sys/net/ipv4/ip_forward
   arpspoof -i eth0 10.0.0.1
   arpspoof -i eth0 -t 10.0.0.113 10.0.0.1
   dsniff –I eth0 -c
NetworkMiner
1.      TCP fingerprinting
2.      Host details
3.      DHCP finger printing
4.      File capture
5.      Passwords
6.      Plaintext
7.      Open pcap
Bridging in Linux setup
    sudo apt-get install bridge-utils   
Script to setup MAC bridging:
    ifconfig eth0 0.0.0.0
    ifconfig eth1 0.0.0.0
    brctl addbr mybridge
    brctl addif mybridge eth0
    brctl addif mybridge eth1
    ifconfig mybridge up
Things to show while bridged
    ifconfig
    sudo tcpdump -i mybridge -s 0 -w out.cap
    sudo etherape -i mybridge
    sudo driftnet -i mybridge
Metasploit/SET
   Backtrack->Penetration->SET
   Menu Choices 2, 1, 2 (Google.com), 2, 2, default, no
   <go to page>
   sessions -i 1
   use sniffer
   help
   sniffer_interfaces
   sniffer_start 2
   sniffer_dump 2 /tmp/all.cap
   <Show in Wireshark>

Thursday, March 10, 2011

Mastering the Nmap Scripting Engine-Defcon 18


Most hackers can use Nmap for simple port scanning and OS detection, but the Nmap Scripting Engine (NSE) takes scanning to a whole new level. Nmap's high-speed networking engine can now spider web sites for SQL injection vulnerabilities, brute-force crack and query MSRPC services, find open proxies, and more. Nmap includes more than 130 NSE scripts for network discovery, vulnerability detection, exploitation, and authentication cracking.

Rather than give a dry overview of NSE, Fyodor and Nmap co-maintainer David Fifield demonstrate practical solutions to common problems. They have scanned millions of hosts with NSE and discuss vulnerabilities found on enterprise networks and how Nmap can be used to quickly detect those problems on your own systems. Then they demonstrate how easy it is to write custom NSE scripts by writing one from scratch and using it to hack a webcam. All in 38 minutes, as given live at Defcon 18!

Monday, March 7, 2011

GNACKTRACK R6

GnackTrack is a Live (and installable) Linux distribution designed for Penetration Testing and is based on Ubuntu. Although this sounds like BackTrack, it is most certainly not; it's very similar but based on the much loved GNOME!

 This version patches the compat-wireless modules, providing better support for injection and monitor mode. A Windows XP styled theme has also been included, allowing you to quickly emulate an Windows XP box!


r6 is the recent version of gnactrack

You can download GNACTRACKR6 here

GNACKTRACK R6

GnackTrack is a Live (and installable) Linux distribution designed for Penetration Testing and is based on Ubuntu. Although this sounds like BackTrack, it is most certainly not; it's very similar but based on the much loved GNOME!

 This version patches the compat-wireless modules, providing better support for injection and monitor mode. A Windows XP styled theme has also been included, allowing you to quickly emulate an Windows XP box!


You can download GNACTRACKR6 here

NMAP-ADVANCED & BASIC FINGERPRINTING

NMAP(Network Mapper) is one of the most basic & advanced fingerprinting tool.I totally recommend this tool to everyone.


Basically NMAP is port scanner with advanced features like host identification topology etc
The six port states recognized by Nmap
OPEN
An application is actively accepting TCP connections, UDP datagrams or SCTP associations on this port. Finding these is often the primary goal of port scanning. Security-minded people know that each open port is an avenue for attack. Attackers and pen-testers want to exploit the open ports, while administrators try to close or protect them with firewalls without thwarting legitimate users. Open ports are also interesting for non-security scans because they show services available for use on the network.
CLOSED
A closed port is accessible (it receives and responds to Nmap probe packets), but there is no application listening on it. They can be helpful in showing that a host is up on an IP address (host discovery, or ping scanning), and as part of OS detection. Because closed ports are reachable, it may be worth scanning later in case some open up. Administrators may want to consider blocking such ports with a firewall. Then they would appear in the filtered state, discussed next.    
FILTERED 
Nmap cannot determine whether the port is open because packet filtering prevents its probes from reaching the port. The filtering could be from a dedicated firewall device, router rules, or host-based firewall software. These ports frustrate attackers because they provide so little information. Sometimes they respond with ICMP error messages such as type 3 code 13 (destination unreachable: communication administratively prohibited), but filters that simply drop probes without responding are far more common. This forces Nmap to retry several times just in case the probe was dropped due to network congestion rather than filtering. This slows down the scan dramatically.
 
UNFILTERED 
The unfiltered state means that a port is accessible, but Nmap is unable to determine whether it is open or closed. Only the ACK scan, which is used to map firewall rulesets, classifies ports into this state. Scanning unfiltered ports with other scan types such as Window scan, SYN scan, or FIN scan, may help resolve whether the port is open.
 
open|filtered
Nmap places ports in this state when it is unable to determine whether a port is open or filtered. This occurs for scan types in which open ports give no response. The lack of response could also mean that a packet filter dropped the probe or any response it elicited. So Nmap does not know for sure whether the port is open or being filtered. The UDP, IP protocol, FIN, NULL, and Xmas scans classify ports this way.
 
closed|filtered
This state is used when Nmap is unable to determine whether a port is closed or filtered. It is only used for the IP ID idle scan.
here are the two videos showing basics of nmap


For those who have low bandwith nd cant go through videos
 Here i used Zenmap(nmap GUI) to scan my windows machine on vmware i used intensive scan with all 65535 ports to scan
 Results were really cool showing all my open ports + os detection was accurate

you can download nmap from here 

do share your views for this tut

Friday, February 18, 2011

Websecurify Security Testing Framework


Websecurify is a powerful web application security testing platform designed from the ground up to provide the best combination of automatic and manual vulnerability testing technologies.

Some of the main features of Websecurify include:

  • Available for all major operating systems (Windows, Mac OS, Linux)
  • Simple to use user interface
  • Built-in internationalization support
  • Easily extensible with the help of add-ons and plugins
  • Exportable and customisable reports with any level of detail
  • Moduler and reusable design
  • Powerful manual testing tools and helper facilities
  • Powerful analytical and scanning technology
  • Scriptable support for JavaScript and Python
  • Extensible via many languages including JavaScript, Python, C, C++ and Java 


You can download Websecuify here

Friday, February 11, 2011

HOW I MET YOUR GIRLFRIEND -DEFCON 18


HOW I MET YOUR GIRLFRIEND from shobhit tiwari on Vimeo.


Here is a interesting video presentation from defcon 18 by Samy Kamkar .The guy is discussing how to attack advanced users who are into computer side via cookie bruteforcing+exploiting there router via XXXSS,XPS and generating the exact geolocation of the victim.

Dont miss this video

Monday, January 24, 2011

Backtrack vs Windows 7

I was watching some video presentations and luckily i found this one :)
this is vocal difference between windows 7 vs backtrack a bit on funny side but worth watching...


Backtrack vs Windows 7

I was watching some video presentations and luckily i found this one :)
this is vocal diffrence between windows 7 and backtrack a bit on funny side but worth watching...


Wednesday, January 19, 2011

[TUT] DarkComet RAT v3.0 Setup

RAT:- Remote Administration Tools
there are lots of difinations of rat, they are used to connect and manage a single or multiple computers with a variety of tools, such as:

* Screen/camera capture or control
* File management (download/upload/execute/etc.)
* Shell control (usually piped from command prompt)
* Computer control (power off/on/log off)
* Registry management (query/add/delete/modify)
* Other product-specific function

In this topic I will show to the people who don't know how to setup DarkComet RAT v3.0.


I will show how setting up the client and how creating a server with the best settings for run under the most different configurations

Download DarkComet RAT v3.0 from its official website

Ok after you download the package lets go

After downloading the package extract it and open the folder you will see this content on the folder

Execute DarkComet. You will see the main page of the programme

This version is allready configured so we can use it without troubles. the important thing is that remember your password because if its wrong and its not the same you provided, the server connection attempts wil be refused.

In socket list you will see the ports are monitored by the client to establish the desired connections with the servers. As you can see here i've configured it as by default at port 1604 and with upnp activated. If your router supports upnp port forwarding will do automatically.
What i mean with port forwarding ?

To add more listening ports you can do it by clicking on listen on the menu or right click on the listview of the sockets in the socket list tab.

click on server module and there is a option of server builder

Double click on the left column settings-01 and you will see this message box

The edit server mode is important to remember if you wish to cript this server in future, RES mode is compatible with the vast majority of the crypters EOF mode is only compatible with the crypters that support EOF Data like crypters that works with Bifrost.
In password field you need to provide the same password configured in the client the password i've used is DarkComet
And The mutex is used to avoid to run more than one instance of the server on the same computer to avoid issues

Here you can configure the ip where the server will connect type your no-ip you have and the port you forwarded correctly and is open and used by the client

Here you can configure the installation options of the server. The image shows the recommended settings. Using the app path will ensure your server installs correctly in evrey systems also in systems with limited users privileges. Otherwise the server will fail to install itself.

The other options ARE NOT important they are optional you can decide to bind the file with another or shield even more the server to ensure that you dont lost connections but activating the persistance option of the shield makes the server unkillable even for yourself that you dont be able to uninstall or close the server. Other options like kill some process of windows and other i dont recommend it.

You can decide activate the offline keylogger. If you forgot like me to activate me doesnt matter you can activate it later


Final step to get your server you only need to click to the build button and thats all.
You will be askin why we dont compress the server in this step the reason is because after compressing it. it seems it doesn't work very good and dont compress the server, as we will compress it later and that will reduce size of the server.


Go to the UPX frontend folder and execute the upxfrontend exe. You will see that window. And configured it correctly be sure is configured as in this image of this app will broke your server and will not work. Be sure is configured as in the image. Press start compression and you will see the server is reduced to only 250kbs. Its very small taking in mind the huge functions darkcomet has. Compare it with cybergate that have a lot less functions and the size of the server is the same.
This process cant be maked after crypting the server first the server needs to be packed and then crypted or the server will be broken.

NOw Go to the DarkComet Crypter folder and run the client. Click when it indicated and press encrypt if you selected eof data check the eof data box if not its not needed. After pressing encrypt and if it all worked correctly you will recive this messagebox.

Thats all now you have your OWN server compressed and crypted only 250kb and detected only by avira and a-squared.

And works like a charm
i've tried my best to make it noob freindly..
source:- google